


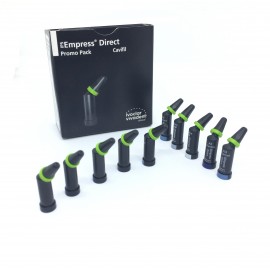
Ivoclar Ips Empress Direct Promo Pack
For fast ORDERING experience Visit our new site  www.medicabasket.com
NOTE: Due to volatility in dental market, Price and stock shown here are tentative and needed approval of supplier, Although we update frequently. Our Team will your order soon.
COD is not available now.
Call/ WhatsApp on +91-9313922999 / +91-9810283698

- Information
-
Dental Brands
- 3M Espe
- 3M Unitek
- A.J. Wilcock
- Agfa
- American Orthodontics
- Ammdent
- Anabond
- Angelus
- API Ashoosons
- API Instruments
- Apple Dental
- Being Foshan
- Bestodent
- Bien Air
- BIOLASE
- Blossom
- Bombay Dental
- Capri
- Captain Ortho
- Cerkamed
- Colgate
- Coltene Whaledent
- Confident
- D-Tech
- Danville
- Denext
- Dental Books
- Dental-Avenue
- Dentaurum
- Dentium
- Dentsply
- Desires ortho
- Detax Dental
- Diadent
- Dispodent
- DMG
- DPI
- Durr Dental
- Eighteeth
- Eltee Instruments
- Endoking
- Euronda S.P.A
- Fgm
- Fuji film
- G&H
- GC
- Gen-XT Implant
- Gendex
- Genoray
- Green Guava
- Hahnenkratt
- Heraeus Kulzer
- Horico
- Hu-Friedy
- ICPA
- Ids Denmed
- IMDSL Laser
- Itena
- Ivoclar Vivadent
- J Morita
- Jota
- Kalabhai
- Kavo
- Kerr
- Kodak
- Labomed
- Leone
- Libral
- Life Steriware
- Maarc
- Mani
- Marathon
- MDC
- Medicept
- Meta
- Modern ortho
- Moriz
- Navadha
- Neelkanth
- NeoEndo
- Novabone
- NSK
- Oracura
- Orateek
- Orchestrate O3D Aligner
- Ormco
- Oro
- Ortho Classic
- Ortho Organizers
- Ortho Technology
- Orthocare
- Orthosource
- Premier
- Prevest
- Prima Dental
- Pulpdent
- Pyrax Dental
- Rabbit Force Ortho
- Rejove 32Watts Aligners
- RS Dental Chair
- Ruby Dental
- Ruthinium
- Saeshin
- Samit
- Scheu
- SDI
- Septodont
- Shivam Dental
- Shofu
- SK Surgicals
- Skydent
- SS-White
- Strong
- Sun Medical
- Sure Endo
- Surgiwear
- Tokuyama
- TP Orthodontics
- Unicorn
- Unident
- Unique
- Vatech
- VDW
- VeeCare
- Vita
- Voco
- VRN
- W&H
- Waldent Equipment
- Waldent Instruments
- Waldent Material
- Woodpecker
- Zhermack
- Zoom
- Triodent
- Other brands
- Offers & Combos
- Contact Us
-
Product Category
- Composites & Restoratives
- Dental Education
-
Dental Equipment
- Air-Motor
- Apex Locators
- Autoclaves & Sterilizers
- Dental Air Compressor
- Dental Chair
- Dental Chair Accessories
- Dental Handpiece
- Dental Laser
- Dental Loupes
- Dental Surgery
- Endo Motor
- Handpiece Cartridge
- Implant Motors
- Intraoral Camera
- LED Light Cure
- Micromotors
- Microscope
- Radiology
- Suction Units
- Ultrasonic Scalers
- UV Chamber
- Dental Lab
- Endodontics
- Implantology
- Instruments And Burs
- New Clinic Setup Kits
- Oral Surgery
- Paedodontics
- Periodontics
- Prosthodontics
- Sterilization & COVID-19 Supplies
- General Dentistry
-
Ortho Store
- Arch Wires & Springs
- Bonding Adhesives
- Elastomerics
- Expansion Screws
- Headgear accessories
- Laboratory Products
- Mini TAD Screw
- Molar Bands and Tubes
- Ortho Attachments
- Photographic Accessories
- Weldable Accessories
- Braces or Brackets
- Clear Aligners
- Orthodontic Appliances
- Orthodontic IPR solutions
- Orthodontic Instruments
- Find Your Dentist
- Medica Basket
Your shopping cart is empty!
- Wide range of indications for anterior and posterior teeth
- Wide range of shades in various degrees of translucency
- Not bound to one given layering technique
- Good polishing properties and high surface luster
- Lifelike fluorescence
- Low sensitivity to light
- Compatible with Tetric EvoFlow and Tetric Color
- The shade guide of the system is autoclavable and made of ceramic: the shade guide retains its precision over many years as the shade samples do not fade if they are exposed to light
Description
PS Empress Direct is a highly esthetic composite for filling cavities in anterior and posterior teeth. It is available in five different translucency levels. Therefore, different types of anatomical features can be faithfully reproduced.
Indications:
- Anterior restorations (Class III and IV)
- Posterior restorations (Class I, II)
- Cervical restorations (Class V, e.g. cervical caries, root erosion, wedge-shaped defects)
- Adjustment of tooth position and shape (e.g. diastema closure, closure of interdental “black triangles”, lengthening of the incisal edge)
- Direct veneers.
Key Specifications
Composition:
- The monomer matrix is composed of dimethacrylates (20-21.5 wt%, opalescent shade 17 wt%).
- The fillers contain barium glass, ytterbium trifluoride, mixed oxide, silicon dioxide and copolymer (77.5-79 wt%, opalescent shade 83 wt%).
- Additional contents: additives, initiators, stabilizers and pigments (<1.0 wt%).
Light intensity- IPS Empress Direct Effect cure with light in the wavelength range of 400-500 nm.
Particle size- of the inorganic fillers is between 40 nm and 3 μm with a mean particle size of 550 nm.
Contraindications:
- If a dry working field cannot be established, or if the stipulated technique cannot be applied.
- if a patient is known to be allergic to any of the ingredients in IPS Empress Direct.
Storage – - Storage temperature 2-28 °C / 36-82 °F.
- Close syringes/Cavifils immediately after use.
- Exposure to light causes premature polymerization.
Packaging
Promo Pack - 10 x 0.2g
Dentin shades:
- 1 x A1
- 1 x A2
- 1 x A3
Enamel shades:
- 1 x A1
- 2 x A2
- 2 x A3
1 x Trans Opal
1 x Trans 30
Direction to Use
----STEP 1. Clean the teeth prior to shade determination.
STEP 2. Isolation Adequate relative or absolute isolation using suitable auxiliaries.
STEP 3. Cavity preparation Cavity preparation is carried out according to the requirements of the adhesive technique, i.e. protecting the tooth structure. Do not prepare any sharp internal edges nor additional undercuts in caries-free areas. The cavity geometry is mainly determined by the extend of caries and/or the old restoration. Enamel edges in the anterior region are bevelled. In the posterior region, only sharp enamel edges should be rounded (finishing diamonds, 25-40 μm). Subsequently, all residue in the cavity is removed with water spray. The cavity is dried with water- and oil-free air.
STEP 4. Pulp protection / Base Do not apply a base material when using an enamel/dentin bonding agent. Only cover very deep areas close to the pulp with a calcium hydroxide material (e.g. ApexCal®) and subsequently use pressureresistant cement (e.g. glass ionomer cement, such as Vivaglass® Liner). Do not cover other cavity walls, since they can be used to support the bond with an enamel/dentin adhesive.
STEP 5- Placement of a matrix / interdental wedge
STEP 6- Conditioning / Application of the bonding agent
STEP 7- Application of IPS Empress Direct – Since a large number of IPS Empress Direct Dentin and Enamel shades in different translucencies for the creation of anatomical details are available, any layering technique can be creatively used to achieve highly esthetic restorations.
Apply IPS Empress Direct in layers of max. 2 mm (or 1.5 mm Dentin shades) thickness. Sufficient exposure to the curing light prevents incomplete polymerization. Recommended curing times (exposure time) should be used. Hold the light emission window as closely as possible to the surface of the restorative material.
STEP 8- Finishing / Checking the occlusion / Polishing Remove excess material with suitable finishers or fine diamonds after polymerization. Remove proximal excess with diamond finishers, tungsten carbide finishers, finishing strips, or flexible finishing discs.
STEP 9- Check the occlusion and articulation and apply appropriate grinding corrections to prevent premature contacts or undesired articulation paths on the surface of the restorations. Use silicone polishers as well as polishing discs and polishing strips to polish the restorations to a durable high gloss.